Wednesday, October 23, 2013

Playing catch-up

Trying to get caught up on projects. Right now I have three going. I work on one til I get too much "wet" and then move to another. I have even set up another table in my scrap room to hold the wet stuff while it's drying. Some I will be able to share as I get it complete and some notsomuch as they are for Christmas gifts.

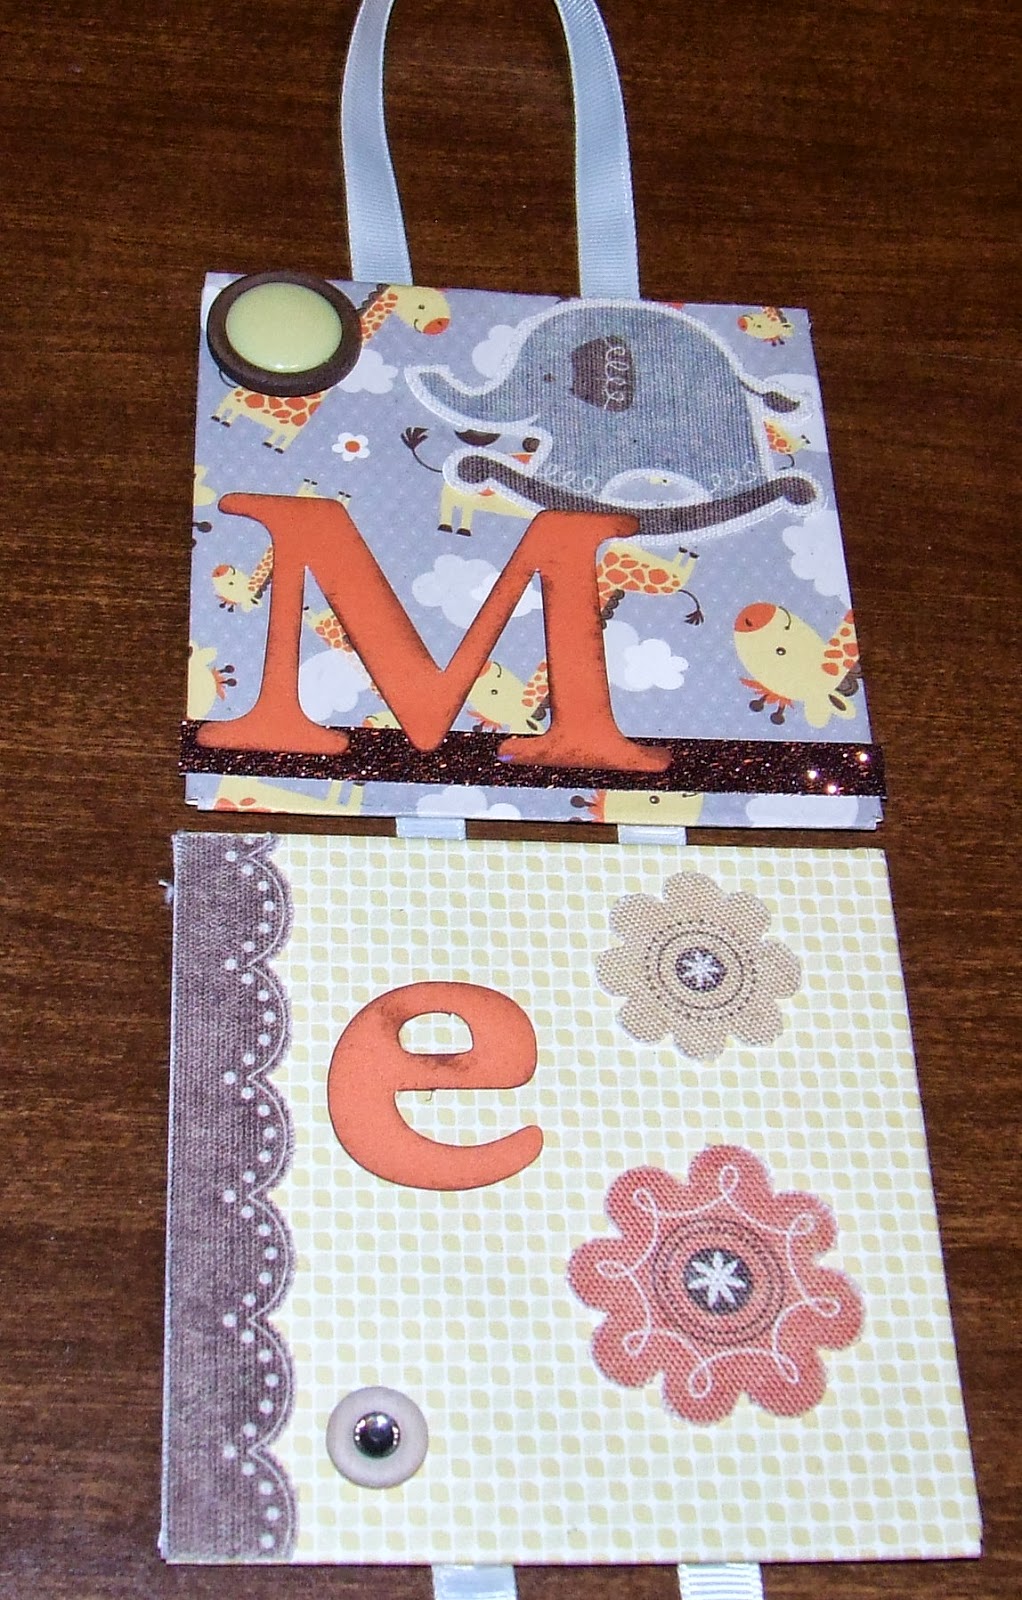
Here is a couple that I CAN share. My nail gal over over 10 years will be welcoming her second grandchild the middle of February 2014. I'm already betting on a Valentines Day girl! They know it's a girl to go with their soon to be 3 year old son and her name will be Melanie. So of course I had to do one of Sue's World Famous Name Wall Hangings for her room! CTMH has the cutest "baby" paper pack in the Fall/Winter Idea Book called BabyCakes, so that is what I used along with the Canvas Compliments that go with the paper pack.

A fellow CTMH Consultant who used the paper pack for her contribution to this summer's Convention used our 3 x 3 blocks to make "alphabet blocks" which were displayed in the Art Room. I took her idea and made it my own, using more of the Canvas Compliments and other stamp sets that I have accumulated over the years. What is hard to see in the pics is the Glossy Accents and Viva Iridescent German Glitter tht I used on the side with the birds and the side with the bee, dragonfly and ladybug.


Thursday, October 17, 2013

Tablet Cover

John and I each have an Android Tablet. Apparently if you buy Andriod, you are only allowed ONE type of cover. Black, black or black. Same style made by the same company and the salespeople tell us there are no further choices coming in the forseeable future. So we were always getting our tablets confused. I'd pick up his, he'd pick up mine. You get the idea. What's a girl to do? I thought about blinging mine out, but I'm not a huge bling fan. Plus, how do you make it "stick?!"

Tim Holtz to the rescue! He introduced a new fabric line at Summer CHA and it recently shipped. The fabrics are based on his paper lines with clocks and gears and measurements and travel. You get the idea. Once Whim So Doodle announced they had the fabric in stock, I had to go get me some. I got 6 different patterns and my first order of business was to "Holtz-ify" me a tablet cover. I did a simple quilt square pattern with the raw edges to the outside. I wanted it to have some texture and interest. I am very pleased with how it turned out. I added a few buttons here and there for a little added interest.

original black cover

front of tablet

back of tablet

tablet open

Sunday, October 13, 2013

Halloween Tag Book

I went to Whim So Doodle yesterday for a Halloween Tag Book class taught by friend Donna who blogs at From My Art 2 Yours. It was her first time ever teaching and she did a fab.u.lous job! I can't wait to take more classes with her!

This is a picture heavy post, so here goes.

All the things we'll need to create our own book.

Great stuff!

Different elements drying

Completed front cover.

Close up of the hanging bits. A skeleton hand, skull and crossbones, wishbone, old tooth and a corked vial that I put Distress Glitter Rock Candy in and tinted with Alcohol Ink.

Skulls on the bolts holding the book together.

Tag 1 and pocket.

The Chemist

Now Mr. Skull Head!

Tag 2 and pocket

Spider webs

Tag 3 and pocket

Dancing skeleton

Tag 4 and pocket

Writing scripts for POISON!

Back cover


Saturday, October 12, 2013

Creative Chemistry 102 Day 5

Sorry for the delay in my post! Yesterday was a crappy day all the way around, but it's a new day and I'm moving on!

I was not able to complete two of the tags for yesterdays lesson since my order from Simon Says Stamp has not arrived. So when I get it and the tags are complete, I will post them.

Our last lesson dealt with Embossing Effects. My completed tags are:Sticky Powder with Glitter, Shabby Chic, Rusting with Distress Powder and Tarnished Silver. I even managed to get a piece of Tim's new fabric line called "Ticking" on the Tarnished Silver tag.


Sticky Powder with Glitter

Shabby Chic

Rusting with Distress Powder

Tarnished Silver

Thursday, October 10, 2013

Creative Chemistry 102 Day 4

And it's Day 4 of CC 102 with Tim Holtz. Can I just say what a fantastic instructor he is. If you've hung out on my blog, or know me in real life, you know what a fan of his I am. And I think part of it is how he breaks everything down so that everyone, from the beginner to the advanced can have a remarkable experience. If you've never been able to take a class with him in person, this is a great second best. And you have the ability to stop and rewind as many times as you'd like, not to mention lifetime access to the class. You can still sign up here.

So today we focused on Alcohol Inks. Fun class. Learned some new things and had some already learned things refreshed in my head. One thing I will say about one of my tags. The Tinted Tinsel tag. Should you ever decide to do this technique, do not use the same color of alcohol ink on your tinsel as you do on your tag! It makes the colors in the tinsel not as intense as they should be. But I liked my tag and my tinsel and I wasn't gonna change it!!

On with the techniques. Faux Patina, Tinted Tinsel, Ombre', Monoprint and Faded Layers.

Faux Patina

Tinted Tinsel

Ombre'

Monoprint

Faded Layers

Wednesday, October 9, 2013

Creative Chemistry Day 3

Day three already. And it's not too late for you to sign up! Only requirement is that you be a graduate of Creative Chemistry 101. You can find out all the information you need here.

Today's lesson was about Distressing Differently.  

Smudge Stamping

Brayered Stains

Photo Tinting

Faux Cracked Glass

Distress Glitter Rock Candy

Distress Glittering

Tuesday, October 8, 2013

Creative Chemistry 102 Day 2

It's Day 2 of Creative Chemistry 102 and today it's all about Tim's wonderful new Layering Stencils. I still don't have all 14...and now he's added another one as of today. The new one is called Shattered and it kinda looks like cobwebs, but can also be used as shattered glass.

I used some Dina Wakely stamps, some Dyan Reaveley stamps, some Brett Weldele stamps and of course some Tim stamps!

Here's my 6 tags for today:

Mixed Media Layering

Embossing with Stencils

Embossing through stencils

Stencil Stamping

Stencil Sketching

Ink Monoprint

Paint Monoprint